Sunday 25 August 2013

Chunky braid


Close on the heels of my first kumihimo braid bracelet comes this 2nd one.
I couldn't sleep at all on friday night and after just an hour in bed decided to get up and go into my craft room. The discs were still out so I had another go with the thicker cords and got on with them much better.

This is the result .......
It looks tiny but that's only because the cords are so thick, the end caps are 6mm as opposed to 3mm on the other one. The findings came with the ring for an embellishment so I used this silver toned teardrop which is recycled from broken jewellery given to me. I love the colours of this and the cord and resulting braid is very soft and pliable with a lovely sheen to it.

Saturday 24 August 2013

Kumihimo braid

I went up to tidy my craft room this morning and as most crafters will identify with as soon as the desk space was clear I had to sit down and make something.
While tidying I came across the bag which still held the cords and Kumihimo disc that I bought way back in May. I'd chosen the pink and charcoal grey cords to make something for myself for my holiday which is coming ever closer.
I'd been advised by the person selling and demonstrating the disc to use the full length of cord and bind and cut the braid where it was needed rather than work in small pieces as it inevitably saves on cord as you are not wasting it to knot each time.

The cords I had chosen were very thin and I found it a very long, tedious task but eventually used it up and bound one end before cutting off the knot and gluing on a cap and lobster clasp. Once this was dry I measured it to fit my wrist then bound in 2 places close together and cut between the binds before gluing on the 2nd end cap and extender chain.


 I found a couple of gem encrusted charms recycled from an old piece and a couple of leaf charms and attached these to the braid with silver plated jump rings, they will move freely along the bracelet when worn.


I've already sat tonight and done a 2nd using the already braided cord with gold coloured end caps and a ring and toggle fastening. The glue on this is still drying, i'm not sure if i've anything suitable to hang from it so may leave it plain.
I'm going to persevere now with the cord I bought with the original disc and see if I can make another bracelet. These cords are much thicker and softer, I tried using them before but found the colours - white, ivory, grey & pale blue to similar to distinguish between so gave up.

Friday 9 August 2013

Coming along nicely

Well this was to be my 'dark night' project to keep me occupied while hubby is working nights but I can't leave it alone for long.
I'm continuing with my blues and purples as planned. I had thought the white was a little too bright but it's blended in ok and now I think the 'Cadbury' purple may be a bit too dark but I suppose that will change as other shades are added.
I'm finding it easier to work on now, as the piece gets larger it somehow gets easier to handle. Not sure at what size it will become harder to manage.

Just have to include a photo of the orchid i've been nursing along for the past year. It was bought for me for Christmas 2011 and produced lots of lovely flowers but they died off gradually and for the last 15 months or so i've just had leaves. I bought some drip feeders for it in May and it produced a stem at last and now I have 5 beautiful flowers and several more buds. 
Not a very good pic i'm afraid.


Tuesday 6 August 2013

I think i've done it!

I taught myself how to crochet a basic granny square earlier in the year and have completed a couple of blankets by just carrying on until the square was large enough for my needs.
Last week though after seeing pics other people had posted on Facebook of blankets I decided to try a straight granny. This is where the rows go back and forth rather than round so meant finding out how to start the foundation row and turn around at the end of it.
Good old Youtube came to the rescue as usual and this is my first attempt. 
I know it's nowhere near perfect but it gave me the practice I needed before moving on.

This is my next try with something like 160 chains to begin my foundation row. It took a lot of concentration and checking back with the tutorials but I finally got there and managed to turn the work and add in new colours.
I've managed to find a few more shades of blue and purple and am going to try to work them randomly until the piece is near enough square or I use it all up, then add a border. I find random quite difficult to do as i'm always looking for a pattern in things, I think children do random far better but as i've got none here it's got to be my choice.
At the moment i've added a couple more pale purples, a blue and white and it's looking a bit brighter than these few rows would suggest.

Rather than sell this when it's finished i've decided to keep it for myself as I rather like the colours. :-)
 This will be an ongoing project for me to pick up and do a row whenever the fancy takes me so i've made a note in my book of the hook size and will add any other notes as I work. I've lost count of how many times i've come to finish a garment and couldn't remember the size i'd worked to be able to do neckbands etc.


Wednesday 31 July 2013

1st birthday


It's our neighbour's little boy's 1st birthday at the beginning of September so i'm a bit ahead of myself with this card but we are away for the date so wanted to make sure it was ready.
The image is from Lili of the Valley, I think, it's been cropped a little and the edges rounded before being edged with a grey Promarker. The green backer has been treated the same way. 

2 pieces of card candi have been added to the corners and a peel-off greeting and number to the opposite side. 


A few sneak peeks now of the other 3 cards i've just finished. Can't show too much as I know 1 of the recipients reads my blog and as the feed goes on facebook the other 2 are likely to see it. 


I've used the same stamped image on all 3 with different coloured Promarkers. They have been cut using Nesties and layered up onto card in complimentary shape. The backing card has been embossed using a Cuttlebug embossing folder and paper flowers used with tiny brads.

I've enjoyed my morning using craft items i've not used for a while and am pleased i've got something to show for it.


Sunday 28 July 2013

Flying high

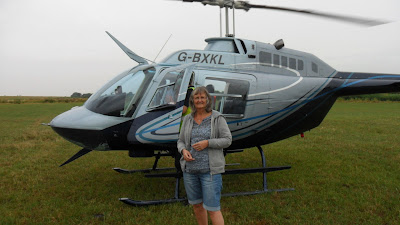
Yesterday I fulfilled a long held dream of mine to fly in a helicopter.
The flight was a gift from my husband for my 60th birthday last year, we waited until the better weather to take it and what do you know ...... it was almost cancelled because of rain, after us having 3 weeks of solid sunshine. In fact the flight after ours, the last of the day,  was cancelled, it had been raining most of the afternoon and visibility was not good. We flew with Adventure 001


My husband and 2 other passengers were in the back and I was up in the co-pilot's seat :-) with full harness, I paid extra for the privilege but it was so worth it to have a view from the front interrupted only by water on the front of the helicopter.

We flew at over 130 miles an hour and at one point over 2200 feet high but mostly at 1300 feet. We took off from a field close to the West Usk lighthouse near to Newport in Gwent and flew over Cardiff docks, the Millenium stadium and the City centre then on to Caerphilly and the Brecons. Back down through Newport then following the motorways over Caldicot and onto the 2 suspension bridges over the River Severn. They seem to cover a vast amount of mud and water joining England and Wales. We followed the river back up to Newport docks, finally flying over the power station where my husband works before landing back in the field to be greeted by our family. We have videos of the take off and landing but sadly none from the air as the camera would surely have focused on the rain drops being blown across the cockpit windshield.
Ideally we wanted to be able to see where we live but realised that by being over Caerphilly we must have already flown over our area. You truly do not realise the speed at which you are travelling until you think how far you have travelled.

On our way to board.

You can see my legs in the front.


All over and so happy to have been able to do it.


Our Pilot, shame he blinked ;-)  We all had to wear the headsets with built in microphone to drown out the noise and enable us to talk to each other. It was interesting to hear air traffic control and other aircraft. We had to inform Cardiff airport we were flying in their area and inform them when we were landing again.


Finished for the day, you can see how misty it has become with low cloud and rain.

Thursday 25 July 2013

More soft and cuddly

I had a sewing day yesterday and made these cute little blankets, each measuring about 10 inches square with 12 little ribbon loops. 
 The front is polycotton in a cute nursery design and the backer of each is a soft fleece fabric. The ribbon loops are triple stitched for security.


Half the fun is choosing the ribbons from my stash and deciding where to position them. I had the order for 1 in pink and 1 in purple the day before but suddenly I was required to make 2 pink ones. Luckily i'd been shopping and picked up a few new ribbons. I like to use a good mix of texture and widths to add more interest.

My local craft shop has had a 50% off sale on for a couple of weeks but didn't have much to choose from in my colours so I just got the wide pink ribbon in 2 shades. I'd already got the lovely spotty ribbons and a few of the others, I particularly like the ric rac.

These have already been posted off, wrapped carefully in tissue paper before going in a plastic bag and large envelope , one for a newborn girl and 2 to be put away I think for one due later in the year.

Thursday 18 July 2013

2 for Mum


A couple of the cards I made while I was trying to distract myself from starting more knitting. ;-)

They are both for my Mum and made using Kanban toppers and sentiments.
This first one is for her birthday, rather obvious really. 


I've used a textured pearlescent backing card with a lovely punched edge and trimmed it with bright pink ribbon salvaged from a tee shirt onto which i've stuck pink gems.
I've got to think of a witty insert as she was diagnosed type 2 diabetic last year and won't be allowed to eat much cake.

This next one is a 'thinking of you' card. It is her wedding anniversary 2 days after her birthday and this is the 4th without Dad by her side. I've continued to send a card each year just to let her know we still recognise the date and are thinking of her.
This is a cute design which i'm sure she'll love as we had a little Yorkie like this many years ago.


Wednesday 17 July 2013

Feathery & fluffy

It was my daughter's birthday last month and when I asked her what kind of card she wanted she told me something feathery and fluffy with glitter on it - something different.
Luckily I had some feathers and remembered a card i'd done some time ago using skeleton leaves and a peel-off bodice to make a ball gown type thing.
This is what I came up with and she loved it even if it was a little worse for wear after the postman tried to bend it to force it through her letterbox while she sat in full view of the window, he had a hard job what with 2 layers of card stuck onto the main cardstock ;-)
It's a large card - 8 inches square -  with 2 layers of pink pearlescent textured card punched at the edge with a Martha Stewart punch and held together with glittery brads. 

The bodice shape is cut from a piece of pale lilac glitter card and has cream feathers attached to the underside and a strip of white lace with silver thread attached to the lower edge. The top edge is decorated with liquid pearls in a pale pink shade. The words are peel-offs.


  .


Wednesday 10 July 2013

Catching up

Well I know it's been a while since I was on here but even so to forget my password is a bit much. Here now though so that's all that matters.

I've not made many cards recently, only those which needed sending. I've not been completely idle though as other crafts have taken up my time.
Back in May I decided to buy myself a new sewing machine and i've been having fun looking for and ordering some cute fabrics.
I've made a few of these blankets which I like to call cuddly comforters - i've actually managed to sell a few as well. :-)


I love the clean fresh look of this nursery fabric and bought it in all the 4 colours - pink, blue, lilac and cream. The backing is a nice soft fleece fabric and the ribbons and braids all come from my slowly decreasing stash. Each blanket measures about 10 inches plus the length of the ribbons. There's approximately 2 yards of ribbon on each one but each loop only measures 6 inches so a good way to use up some smaller pieces. All triple stitched for strength.
They are available on my fb page. Swardys-Knitted-Creations

I hope everyone has not forgotten me and I get a few views on this, would be a bit embarrassing if no-one came to look. ;-)

Sue xx

Friday 8 March 2013

Same stamp different cards

Ooops didn't realise it was so long since I blogged. 

Anyway to make up for it 2 cards in the same post, hopefully they show how the same stamp can be versatile and used for different ages.
This is the one I made for my husband's birthday earlier in the week.
It's a large card - 8 inch square with scalloped edges and has been covered with a brown and gold chevron type paper that i've had for ages. the cars and sentiments have all been stamped on cream cardstock using the same ink. It's a colorbox queue ink but i'm not sure of the colour. The stamps are from the one sheet and are made by Kanban.
This second one was made for our neighbour's son who celebrated his 2nd birthday on the same day.
I've used the same stamp, inked in a brighter colour then layered up onto a colourful number and vehicle backing paper.

I hope to get back into blogging again but knitting seems to be taking more of my time and cardmaking has taken a backseat for a while.